
NFS Share Installation & Uses in Linux
Aug 10, 2025 5-7 Min Read Article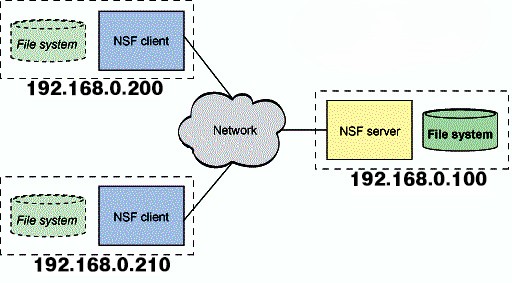
What is NFS (Network File System)?
It allows computers to access files over a network as if they were on their own hard drive.
It’s used to share folders and files between systems — especially on Linux/Unix networks.
Real-Life Analogy
Imagine a shared filing cabinet in an office. Rather than copying documents to each desk, people walk over and use the same cabinet.
NFS is like that — one central place stores the files, and others access it remotely.
To use NFS, we need to setup both nfs-server(mostly in sender os/device) and nfs-client (mostly in receiver's device/os).
It is not needed to follow the above statement, we can do vice versa and after setup put the data in sharing folder and can share as we can make changes within shared directory.
for this, we can use our NFS Bash script or follow below instructions...
Server Installation & Configuration for sharing ( on device 1 - mainly sender )
Mainly Server is installed on a system having data to be shared across clients ( diff systems )
Install NFS Kernal Server:
sudo apt update && sudo apt install nfs-kernel-serverCreate a Directory:
Make a directory within /var directory that we want to share with the client systems.
sudo mkdir /var/<nfs-share-dir><nfs-share-dir> is the name of dir that we want to share
Set Permissions:
Set the appropriate permissions for the directory, by following command:
sudo chown nobody:nogroup /var/<nfs-share-dir>explanation:
chown -> a command that is used to change directory/file owner information.
nobody:nogroup -> assigns no directory owner & no groups to the directory.
Configure Exports File:
Edit the /etc/exports file to specify the directories to be shared and the permissions.
Add the below line to it
/var/<nfs-share-dir> *(rw,sync,no_subtree_check)explanation:
above line allows all clients to read and write to the shared directory.
* -> set defined permission to all files or dirs within <nfs-share-dir>
rw -> assigns read & write permissions to dir for client
sync -> makes <nfs-share-dir> synced with the clint( means any changes on file by server or client side with be reflected instantly on both sides )
no_subtree_Check -> disables subtree checking on the server.
Export the Shared Directory:
Run the following command to export the shared directory:
sudo exportfs -aStart the NFS Server:
to make it accessible by other devices via ip address
sudo systemctl start nfs-kernel-serverEnable NFS Server at Boot (Optional):
If we want to ensure the NFS server automatically starts after boot (restart), run:
sudo systemctl enable nfs-kernel-serverClient Installation & configurations for sharing ( on device 2 - mainly receiver )
Install NFS Common Package:
sudo apt update && sudo apt install nfs-commonMount the NFS Share:
Create a mount point where NFS share will be accessible and mount the NFS share:
sudo mkdir /mnt/<nfs-clientshare>
sudo mount <server-ip>:/var/<nfs-share-dir> /mnt/<nfs-clientshare>
Replace:
<server-ip> -> with the ip address of the device having nfs-share-dir ( sender )
<nfs-clientshare> -> with the name of dir where we want to mount the nfs-share-dir ( receiver )
<nfs-share-dir> -> with the name of dir that we created in server side to share with clients.
it adds the shared folder (by server) to our (client) system
Verify the Mount (Sharing):
We can verify the mount (sharing) by listing the contents of the directory:
ls /mnt/<nfs-clientshare>It will show the shared directory name by server ( <nfs-share-dir> )
Permanent Mount (Optional):
To make the mount (sharing) permanent, so that it will be available after a reboot, add the below line to the /etc/fstab file:
<server-ip>:/var/<nfs-share-dir> /mnt/<nfs-clientshare> nfs defaults 00again replace =>
<server-ip> -> with the ip address of the device having nfs-share-dir ( sender )
<nfs-clientshare> -> with the name of dir where we want to mount the nfs-share-dir ( receiver )
<nfs-share-dir> -> with the name of dir that we created in server side to share with clients.
Congrats! we've successfully set up NFS sharing on Server & Client
Now we can access the shared directory from the client system and perform read/write operations as per the permissions set.
Stop NFS Share from Server side
To stop nfs sharing between the devices we can stop the nfs server, by the command
sudo systemctl stop <nfs-kernel-server>Stop (Unmount) NFS Share from Client side
Unmount the NFS Share
Use the umount command to unmount the NFS share
sudo umount /mnt/<nfs-clientshare>Replace <nfs-clientshare> with the name of the directory where the NFS share was mounted.
After unmounting, the NFS share will no longer be accessible from the client system.
Verify Unmounting:
To ensure that the NFS share has been successfully unmounted, we can check the mount via
df -hthe <nfs-share-dir> will not appear now
Remove Permanent Mount:
If we added the NFS share to the /etc/fstab file for permanent mounting, we should remove that entry to prevent automatic mounting on boot.
We should remove or comment out the corresponding line by adding a `#` at the beginning of the line to prevent it from being mounted automatically at boot (restart).
To do this, we can use a text editor like nano or vim:
sudo nano /etc/fstabthen remove or comment (via adding # at beginning) the below line:
<server-ip>:/var/<nfs-share-dir> /mnt/<nfs-clientshare> nfs defaults 00After editing, save the file and exit the text editor.
NOTE: Remember here <server-ip> is the nfs-server actual ip
<nfs-share-dir> is the name of the server's shared dir
<nfs-clientshare> is the name of the client's mount point
That's it! We have successfully stopped the NFS share from the server side and unmounted it from the client side.
Automated Script
We can use our NFS Share Automation Script to simplify the process of creating, stopping and unmounting NFS shares.
It automates the installation, configuration, and management of NFS shares, making it easier to set up and maintain NFS sharing on Linux systems.